
LudoPinelli/comment-box.nvim
 github
 367
367
 7
7
 3
3
 11
11
Announcement: This plugin has reached a stable state, but I'd like to add more features from your suggestions and from I had in mind. However, I started writing this plugin two years ago without any knowledge of lua and the Neovim api, not to mention a relatively short programming experience, which resulted in a rather messy code, hard to extend and maintain without making more mess. So I decided to rewrite it from the ground up, therefore I won't add any new feature until it's done (but will gladly fix any bug you may find of course).
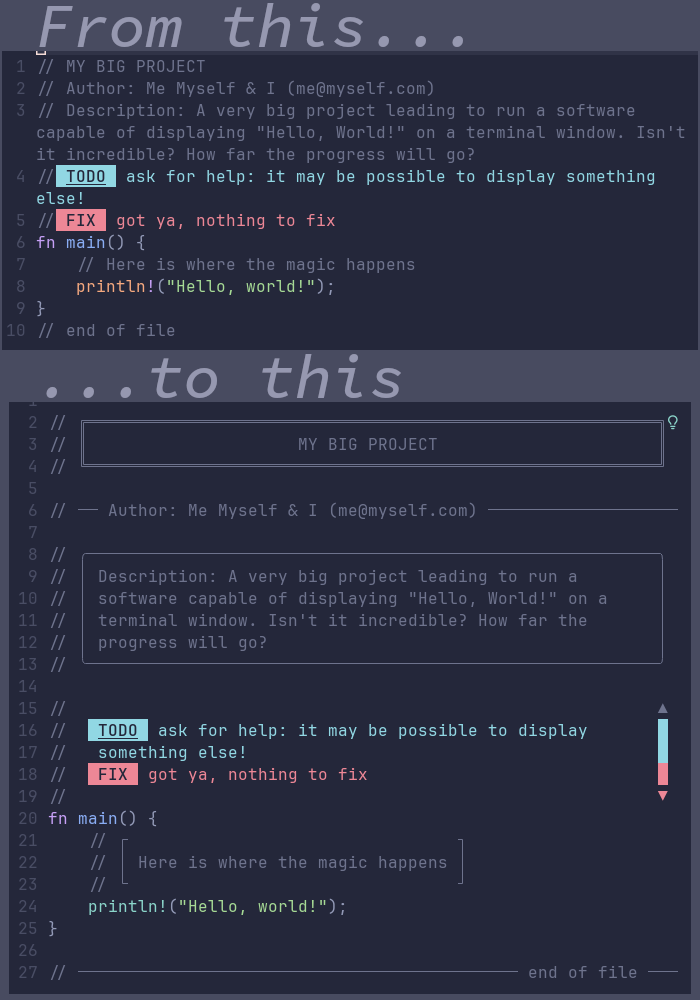
You have this long config file and you want to clearly (and beautifully) separate each part. So you put lines of symbols as separators. Boxes would have been better but too tedious to make, not to mention if you want to center your text in it.
This plugin tries to remedy this by giving you easy boxes and lines the way you want them to be in any kind of plain text file.
Overview
comment-box allows you to:
- draw a box around the selected text or actual line with a simple keyboard shortcut. The box can be left aligned, right aligned or centered, can have a fixed size or be adapted to the text. The text can be left aligned right aligned or centered. Too long text are automatically wrapped to fit in the box. The box can be removed at any time while keeping the text.
- create your own type of box by choosing its width and the characters used to draw the top, bottom, left, right and corners of it.
- integrate your text in a drew line. The line can be left aligned, right aligned or centered. The text can be left aligned right aligned or centered. Too long text will be wrapped, the first line will be integrated in the line, the others will appear commented below the line.
- draw a line with a simple keyboard shortcut. The line can be left aligned, right aligned or centered.
- create your own type of line by choosing its width and the characters used to draw its start, end and body.
- choose from a catalog of 22 predefined boxes and 17 predefined lines and use it by simply pass its number to the function call.
Mainly designed for code comments, comment-box can also be used to brighten up any kind of plain text files (.txt, .md, ...)!
NOT SUPPORTED: Inline comments (at the end or middle of a line) are not supported at the moment.
Prerequisite
Neovim 0.8+
Installation
Install like any other plugin with your favorite package manager. Some examples:
With lazy:
{ "LudoPinelli/comment-box.nvim", }
With packer:
use("LudoPinelli/comment-box.nvim")
If you're fine with the default settings (see Configuration), it's all you have to do. However, comment-box does not come with any keybinding, consult the Quick Start section for recommandations, or see Keybindings examples to fine tuned your own.
Quick Start
If the plugin has tons of commands, you'll most likely need 3 or 4 at most on a regular basis.
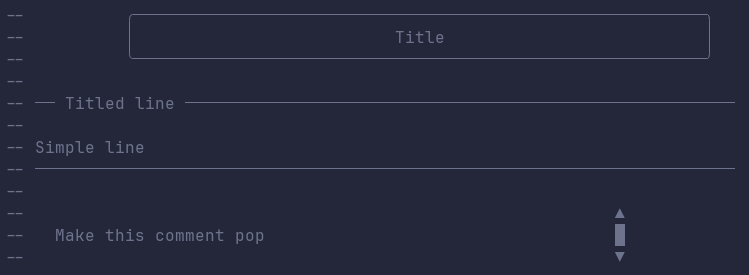
- You'll probably want a box for titles. I personally choose a centered fixed box with text centered :
:CBccbox - A titled line is nice to divide and name each part. I use a left aligned titled line with the text left aligned:
:CBllline - For a simple separation, a simple line will do:
:CBline - Finally, it can be useful to make some important comments pop. To achieve this, choose an appropriate style, I like the 14:
:CBllbox14,:CBalbox14or:CBrrbox14
You may want to try other styles of boxes and lines: open the catalog with :CBcatalog, and take note of the style of boxes and lines you want to use. You just have to add the number after the relevant commands (without spaces), like for the :CBllbox14 above.
To remove a box or line, when an Undo is no more a possibility, select the box or line and use the :CBd command.
You may need to yank the content of a box (without the box). The command is :CBy.
It's of course easier to use shortcuts (here using <Leader>c as prefix):
local keymap = vim.keymap.set
local opts = { noremap = true, silent = true }

-- Titles
keymap({ "n", "v" }, "<Leader>cb", "<Cmd>CBccbox<CR>", opts)
-- Named parts
keymap({ "n", "v" }, "<Leader>ct", "<Cmd>CBllline<CR>", opts)
-- Simple line
keymap("n", "<Leader>cl", "<Cmd>CBline<CR>", opts)
-- keymap("i", "<M-l>", "<Cmd>CBline<CR>", opts) -- To use in Insert Mode
-- Marked comments
keymap({ "n", "v" }, "<Leader>cm", "<Cmd>CBllbox14<CR>", opts)
-- Removing a box is simple enough with the command (CBd), but if you
-- use it a lot:
-- keymap({ "n", "v" }, "<Leader>cd", "<Cmd>CBd<CR>", opts)
Or if you use which-key:
local wk = require("which-key")

wk.register({
  ["<Leader>"] = {
    c = {
      name = " □  Boxes",
      b = { "<Cmd>CBccbox<CR>", "Box Title" },
      t = { "<Cmd>CBllline<CR>", "Titled Line" },
      l = { "<Cmd>CBline<CR>", "Simple Line" },
      m = { "<Cmd>CBllbox14<CR>", "Marked" },
      -- d = { "<Cmd>CBd<CR>", "Remove a box" },
    },
  },
})
If you want more control, the nomenclature for the commands is fairly simple:
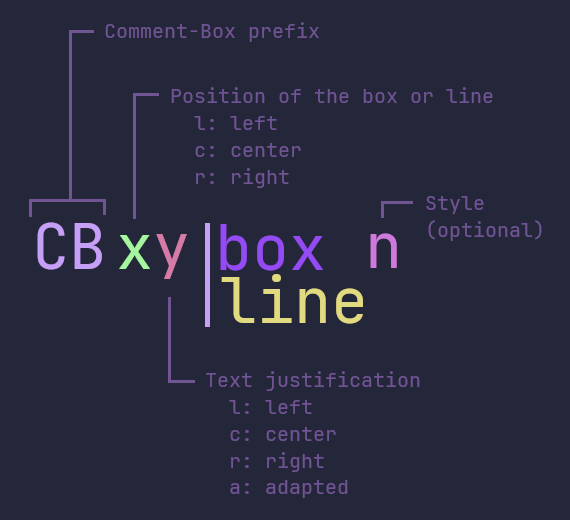
where:
CBis for "Comment-Box"xis for the position of the box or line (l: left,c: center,r: right)yis for the text justification (l: left,c: center,r: right). For the box, it can bea("adapted"): the size of the box will be adapted to the size of the text (up tobox_width)box|lineto choose if it applies to a box or a line[num]is optional an apply a style from the catalog
Exception:
- Simple Lines: no
y.xis the position of the line (l: left,c: center,r: right).
See the rest of this doc for more details.
Usage
Commands
Boxes
| Command | Description | function |
|---|---|---|
CBllbox[num] |
Left aligned box of fixed size with Left aligned text | require("comment-box").llbox([num]) |
CBlcbox[num] |
Left aligned box of fixed size with Centered text | require("comment-box").lcbox([num]) |
CBlrbox[num] |
Left aligned box of fixed size with Right aligned text | require("comment-box").lrbox([num]) |
CBclbox[num] |
Centered box of fixed size with Left aligned text | require("comment-box").clbox([num]) |
CBccbox[num] |
Centered box of fixed size with Centered text | require("comment-box").ccbox([num]) |
CBcrbox[num] |
Centered box of fixed size with Right aligned text | require("comment-box").crbox([num]) |
CBrlbox[num] |
Right aligned box of fixed size with Left aligned text | require("comment-box").rlbox([num]) |
CBrcbox[num] |
Right aligned box of fixed size with Centered text | require("comment-box").rcbox([num]) |
CBrrbox[num] |
Right aligned box of fixed size with Right aligned text | require("comment-box").rrbox([num]) |
CBlabox[num] |
Left aligned adapted box | require("comment-box").labox([num]) |
CBbcaox[num] |
Centered adapted box | require("comment-box").cabox([num]) |
CBrabox[num] |
Right aligned adapted box | require("comment-box").rabox([num]) |
The [num] parameter is optional. It's the number of a predefined style from the catalog (see Catalog). By leaving it empty, the box or line will be drawn with the style you defined or if you didn't define one, with the default style.
A 'centered' box is centered relatively to the width of your document (set to the standard 80 by default, you can change it with the setup() function - see Configuration). Same for 'right aligned' boxes.
An 'adapted' box means than the box width will be adapted to the width of the text. However, if the width of the text exceed the width of the document, the box will have the width of the document. In case of multiple lines with various size, the text is aligned according to the position of the box (left aligned if the box is left aligned, centered if the box is centered, right aligned if the box is right aligned).
To draw a box, place your cursor on the line of text you want in a box, or select multiple lines in visual mode, then use one of the command/function above.
Note: if the text is too long to fit in the box, comment-box will automatically wrap it for you.
Examples:
-- A left aligned fixed size box with the text left justified:
:CBllbox
-- or
:lua require("comment-box").llbox()

-- A centered fixed size box with the text centered:
:CBccbox
-- or
:lua require("comment-box").ccbox()

-- A centered adapted box:
:CBacbox
-- or
:lua require("comment-box").acbox()

-- A left aligned fixed size box with the text left justified,
-- using the syle 17 from the catalog:
:CBllbox17
-- or
:lua require("comment-box").llbox(17)
Titled lines
| Command | Description | function |
|---|---|---|
CBllline[num] |
Left aligned titled line with Left aligned text | require("comment-box").llline([num]) |
CBlcline[num] |
Left aligned titled line with Centered text | require("comment-box").lcline([num]) |
CBlrline[num] |
Left aligned titled line with Right aligned text | require("comment-box").lrbox([num]) |
CBclline[num] |
Centered title line with Left aligned text | require("comment-box").clline([num]) |
CBccline[num] |
Centered titled line with Centered text | require("comment-box").ccline([num]) |
CBcrline[num] |
Centered titled line with Right aligned text | require("comment-box").crline([num]) |
CBrlline[num] |
Right aligned titled line with Left aligned text | require("comment-box").rlline([num]) |
CBrcline[num] |
Right aligned titled line with Centered text | require("comment-box").rcline([num]) |
CBrrline[num] |
Right aligned titled line with Right aligned text | require("comment-box").rrline([num]) |
The [num] parameter is optional. It's the number of a predefined style from the catalog (see Catalog). By leaving it empty, the box will be drawn with the style you defined or if you didn't define one, with the default style.
A 'centered' titled line is centered relatively to the width of your document (set to the standard 80 by default, you can change it with the setup() function - see Configuration). Same for 'right aligned' titled lines.
To draw a titled line, place your cursor on the line of text you want in, then use one of the command/function above.
Note: if the text is too long to fit in the line, comment-box will automatically wrap it for you. The first line of text will be in the line, the others will be commented above it.
TIP: If you have the option comment_style set to "block" or "auto", if selecting multiple lines will only put the first in the titled line, all will be in a common block comment, which can enhance the effect!
Examples:
-- A left aligned titled line with the text left justified:
:CBllline
-- or
:lua require("comment-box").llline()

-- A centered titled line with the text right justified:
:CBcrline
-- or
:lua require("comment-box").crline()

-- A right aligned titled line with the text centered,
-- using the style 13 from the catalog:
:CBrcline13
-- or
:lua require("comment-box").rcline(13)
Removing a box or a titled line while keeping the text
| Command | Description | function |
|---|---|---|
CBd |
Remove a box or titled line, keeping its content | require("comment-box").dbox() |
To remove a box, you must select it entirely in visual mode (or easier in visual line mode (<C-v>)), before using the command CBd (or create a keybind for it, see Keybindings examples). To remove a titled line, just placing the cursor on the line will do.
Limitations: CBd suppose that you used non alphanumeric characters to create the box (which is the case for all the styles in the catalog), nor parentheses or punctuations. It works by removing every non alphanumeric characters, except the characters (){},.;!?, from the beginning of the line and from its end. If you use one of those to create your own type of box, the command won't work properly. Also, if your comment start or end by a non alphanumeric character (ex: -- |comment|), it will be removed.
Yank the content of a box or a titled line
| Command | Description | function |
|---|---|---|
CBy |
Yank the content of a box or titled line | require("comment-box").yank() |
Select the box (or at least the part including the text) or the titled line, then use the command CBy.
Note the text is available in the + register, it assumes that you have the clipboard option set to unnamedplus. If not you may have to specify the register for pasting using "+p. Cby use the same extraction function than CBd and is therefore subject to the same limitations.
Lines
| Command | Description | function |
|---|---|---|
CBline[num] |
Left aligned line | require("comment-box").line([num]) |
CBcline[num] |
Centered line | require("comment-box").cline([num]) |
CBrline[num] |
Right aligned line | require("comment-box").rline([num]) |
To draw a line, place your cursor where you want it and in normal or insert mode, use one of the command/function above.
Note: a line is centered or right aligned according to the width of your document (set to the standard 80 by default, you can change it with the setup() function - see Configuration)
Examples:
-- A left aligned line:
:CBline
-- or
:lua require("comment-box").line()

-- A centered line:
:CBcline
-- or
:lua require("comment-box").cline()

-- A right aligned line using the style 6 from the catalog:
:CBrline6
-- or
:lua require("comment-box").rline(6)
Keybindings examples
Vim script:
# left aligned fixed size box with left aligned text
nnoremap <Leader>cb <Cmd>lua require('comment-box').llbox()<CR>
vnoremap <Leader>cb <Cmd>lua require('comment-box').llbox()<CR>

# centered adapted box
nnoremap <Leader>cc <Cmd>lua require('comment-box').acbox()<CR>
vnoremap <Leader>cc <Cmd>lua require('comment-box').acbox()<CR>

# centered line
nnoremap <Leader>cl <Cmd>lua require('comment-box').cline()<CR>
inoremap <M-l> <Cmd>lua require('comment-box').cline()<CR>

# remove a box or a titled line
vnoremap <Leader>cd <Cmd>lua require('comment-box').dbox()<CR>
nnoremap <Leader>cd <Cmd>lua require('comment-box').dbox()<CR>
Lua
local keymap = vim.keymap.set
local opts = { noremap = true, silent = true }
local cb = require("comment-box")

-- left aligned fixed size box with left aligned text
keymap({ "n", "v"}, "<Leader>cb", "<Cmd>CBllbox<CR>", opts)
-- centered adapted box
keymap({ "n", "v"}, "<Leader>cc", "<Cmd>CBacbox<CR>", opts)

-- left aligned titled line with left aligned text
keymap({ "n", "v" }, "<Leader>ct", "<Cmd>llline<CR>", opts)

-- centered line
keymap("n", "<Leader>cl", "<Cmd>CBcline<CR>", opts)
keymap("i", "<M-l>", "<Cmd>CBcline<CR>", opts)

-- remove a box or a titled line
keymap({ "n", "v" }, "<Leader>cd", "<Cmd>CBd<CR>", opts)
The catalog
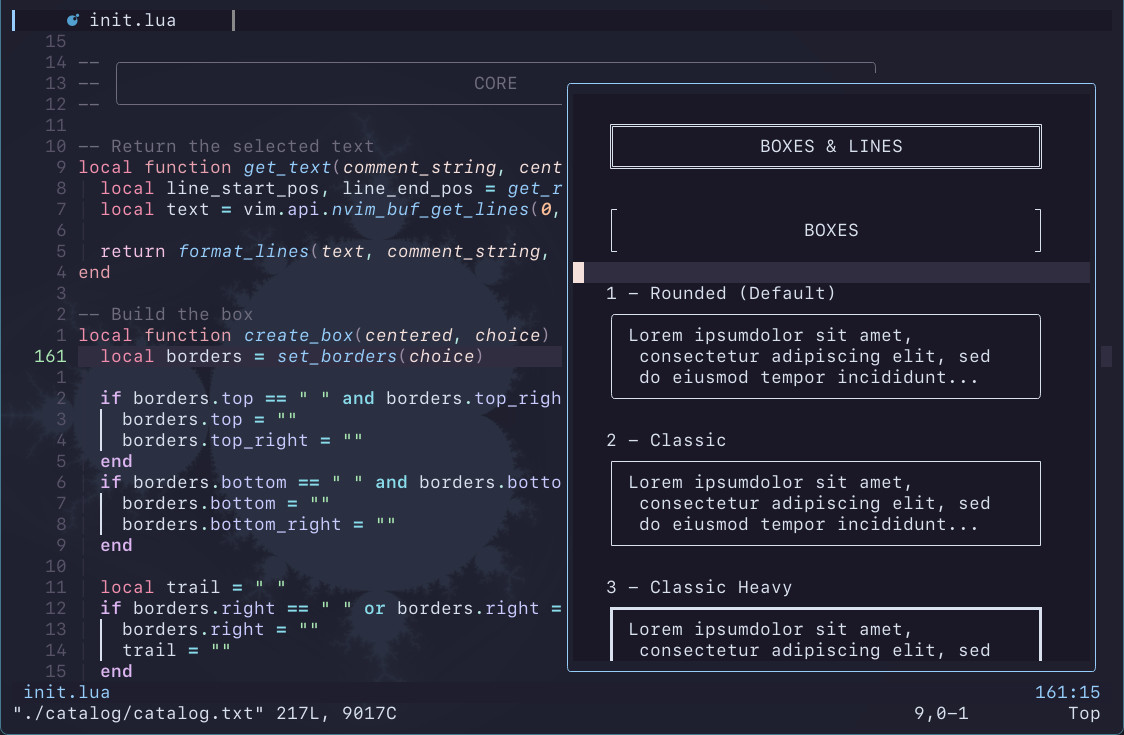
The catalog is a collection of 22 predefined types of boxes and 17 types of lines. You can easily access the catalog in Neovim (it will appear in a popup window so it won't mess with what you're doing) using:
:CBcatalog
-- or
:lua require("comment-box").catalog()
Just take note of the number of the type of box or line you want to use, close the catalog and pass the number to the function. For example:
-- A box with the text centered and the predefined type of box n°10:
:CBcbox10
-- or
:lua require("comment-box").cbox(10)

-- A line with the predefined type of line n°4:
:CBline4
-- or
:lua require("comment-box").line(4)
Or if you found one (or more) you will frequently use, you may want to include it in you keybindings.
Note: in addition to the usual way of closing windows, you can simply use q to close the catalog.
The type n°1 for the box and line is the default one, so, if you didn't change the default settings via the setup() function (see Configuration), passing nothing or 1 (or even 0) will lead to the same result.
Configuration and creating your own type of box
You can call the setup() function in your init.lua(.vim) to configure the way comment-box does its things. This is also where you can create your own type of box. Here is the list of the options with their default value:
require('comment-box').setup({
  -- type of comments:
  --   - "line":  comment-box will always use line style comments
  --   - "block": comment-box will always use block style comments
  --   - "auto":  comment-box will use block line style comments if
  --              multiple lines are selected, line style comments
  --              otherwise
  comment_style = "line",
  doc_width = 80, -- width of the document
  box_width = 60, -- width of the boxes
  borders = { -- symbols used to draw a box
    top = "─",
    bottom = "─",
    left = "│",
    right = "│",
    top_left = "╭",
    top_right = "╮",
    bottom_left = "╰",
    bottom_right = "╯",
  },
  line_width = 70, -- width of the lines
  lines = { -- symbols used to draw a line
    line = "─",
    line_start = "─",
    line_end = "─",
    title_left = "─",
    title_right = "─",
  },
  outer_blank_lines_above = false, -- insert a blank line above the box
  outer_blank_lines_below = false, -- insert a blank line below the box
  inner_blank_lines = false, -- insert a blank line above and below the text
  line_blank_line_above = false, -- insert a blank line above the line
  line_blank_line_below = false, -- insert a blank line below the line
})
comment_style
Determine which style of comments comment-box will use:
"line": only use line style comments"block": only use block style comments"auto": use block style comments if multiple lines are selected, line style comments otherwise
If a language doesn't allow on type of style, comment-box will automatically choose the other one.
doc_width
Width of the document. It is used to center the boxes and lines.
box_width
Width of the fixed size boxes (must be <= doc_width).
borders
The symbols used to draw the boxes. Let your creativity go wild! Or just use the default or choose from the predefined ones (see Catalog).
If you want an element of the box to be invisible, you can use either " "(space) or ""(empty string).
You can even create very ugly ones, no judgement!

line_width
Width of the lines.
lines
The symbols used to draw the lines. Let your creativity go wild! Or just use the default or choose from the predefined ones (see Catalog).
outer_blank_lines_above outer_blank_lines_below and inner_blank_lines

line_blank_line_above and line_blank_line_below
Self explanatory!
Tips
Suggested mappings
You can create a mapping for jumping to the next comment box like this:
-- map ]b [b to go to next block comment
vim.keymap.set('n', ']b', '/\\S\\zs\\s*╭<CR>zt')
vim.keymap.set('n', '[b', '?\\S\\zs\\s*╭<CR>zt')
This matches the first non-whitespace character in a line that precedes a comment box corner piece, ignoring any whitespace in between, and redraws the screen with the comment box at the top.
Note: this example only works for the default rounded box shape. To match a different type of box, replace ╭ with the top-left corner piece of your preferred box type, e.g. ┌ for the classic box shape.
Acknowledgement
I learned and borrow from those plugins' code:
Thanks to @HiPhish for his excellent advice to make the code a bit better (I'm still working on it...), all the contributors and people who submit issues and suggestions.